Home and garden haven

🌿 Love your home & garden? You’re going to love what’s inside.
🛠️ From stunning landscaping ideas to cozy upgrades, unlock tips most people miss.
👉 Grab your free access now

Saturday, November 29, 2025

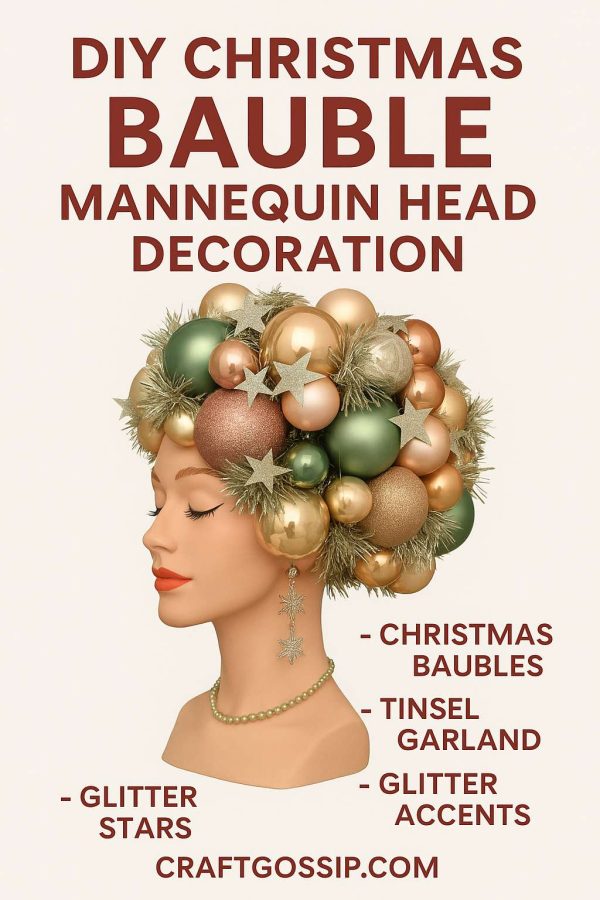
DIY Christmas Bauble Mannequin Head Decoration

DIY Christmas Bauble Mannequin Head Decoration

If you’re looking for a show-stopping holiday centerpiece, this mannequin head Christmas decoration is a fabulous way to add glam, sparkle, and a little humor to your décor. It’s part vintage kitsch, part modern glam, and entirely unforgettable. Think of it as a conversation starter that can sit on your entryway table, dining buffet, or even as a quirky Christmas party decoration.

This project is easy to customize with your favorite colors—go traditional red and green, elegant gold and silver, or soft pastels for a whimsical look.

Supplies You’ll Need:

  • 1 mannequin head (styrofoam or plastic works fine)

  • Assorted Christmas baubles (variety of sizes—small, medium, large)

  • Hot glue gun + glue sticks

  • Tinsel garland (silver, gold, or matching your color scheme)

  • Glitter stars, snowflakes, or other small embellishments

  • Faux greenery picks (optional, to tuck between baubles)

  • Jewelry accents (beads, faux pearls, old costume earrings/necklaces)

  • Spray paint or craft paint (optional, if you want to paint the head base)

Step-by-Step Instructions

1. Prepare the Head

If you’re using a plain mannequin head, give it a quick wipe down. Optional: paint the face white for a stylized retro look, or leave it skin-tone for a more natural base.

2. Plan the “Hairstyle”

Before gluing, lay out your ornaments on the table. Start with the biggest baubles, then fill in with smaller ones. You want the shape to mimic hair volume—fuller on top, tapering down around the ears and back.

3. Start Gluing

Using your hot glue gun, begin attaching the largest baubles around the crown and top of the head. Hold each one in place until the glue sets. Continue around the sides and back, keeping the ornaments tight together.

4. Fill the Gaps

Add medium and small baubles to fill in spaces. Don’t worry if a little head shows through—you’ll cover those with tinsel or greenery.

5. Add Sparkle and Tinsel

Once the baubles are secure, tuck strands of tinsel garland between them. Glue on glitter stars or snowflake cut-outs for extra shine. Faux pine sprigs also look great tucked in for a festive texture.

6. Dress It Up

Give your mannequin some holiday glam by adding costume jewelry. A beaded necklace, sparkly earrings, or even a strand of pearls instantly takes her from plain mannequin to Christmas diva.

7. Display

Place your finished bauble head on a mirrored base or cake stand for extra drama. She’ll sparkle under the lights and quickly become everyone’s favorite holiday guest.

Tips & Variations

  • Use shatterproof ornaments if you want it to last from year to year.

  • Spray paint older or mismatched baubles to fit your color theme.

  • Add fairy lights by weaving a battery-operated string through the ornaments.

  • For a vintage look, stick to pastel pinks, mint green, and gold.

  • For a glam look, go all metallic with silver, gold, and bronze.

This DIY mannequin Christmas decoration is playful, chic, and over-the-top in the best way. Every time I walk past mine, I can’t help but smile—because Christmas should always feel a little magical and a lot of fun.


* This article was originally published here

Friday, November 28, 2025

Fine dining in your front room: from tea bags to ceramics, top restaurant essentials to transform meals at home

Never mind the food, what about the vibe? Restaurateurs share tips and tricks that will bring a touch of restaurant magic to your table

Restaurants are temples of aspiration. From sound, scent and ceramics to hand soap and elegant wine glasses, I’ve often wanted to recreate elements of my favourite restaurants at home. I’m unlikely to sous-vide celeriac or triple cook my chips, but I can elevate my plate of pasta with a drizzle of amazing olive oil, or invest in a cutlery set that gives even a midweek dinner a sense of occasion. As much as the cooking, it’s the little details that are, as celebrated chef Skye Gyngell puts it, “what you take away and what make you feel wonderful”.

I spoke to restaurateurs across the UK about the little touches that make their restaurants distinctive – and easy ways to bring their magic into our homes.

Continue reading...

* This article was originally published here
Thursday, November 27, 2025

Two Australian homes win top places in international 2025 Dezeen awards

A Dracula-inspired bathroom in Sydney and an outside-inside home in Melbourne claim interior design and architecture prizes

Point Piper in Sydney’s eastern suburbs is home to one of the best bathrooms in the world, according to the annual Dezeen awards, a global design accolade.

Its dark, moody and luxurious interiors were partly inspired by Bram Stoker’s Dracula.

Continue reading...

* This article was originally published here
Wednesday, November 26, 2025

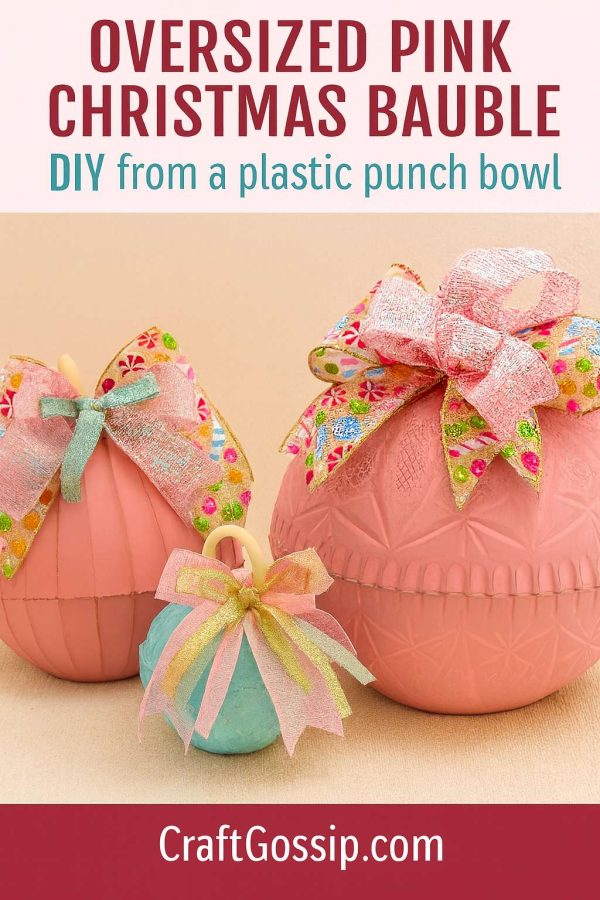
Oversized Pink Christmas Bauble DIY (Made from a Plastic Punch Bowl)

Oversized Pink Christmas Bauble DIY (Made from a Plastic Punch Bowl)

If you’ve been scrolling through Pinterest lately, you’ve probably seen those dreamy oversized ornaments popping up in pastel candy-shop colours. They’re festive, a little whimsical, and the perfect mix of vintage charm and modern holiday cheer. The only downside? Buying them can cost a small fortune.

But here’s the secret — you can make your own giant pink Christmas baubles for next to nothing, using a plastic punch bowl from the dollar store. Yes, really! With a few coats of spray paint, a handful of ribbon, and some creative flair, you can transform an everyday punch bowl into a stunning centrepiece that looks like it came straight from a high-end holiday boutique.

I first made a version of this project years ago for Halloween pumpkins, but when I saw how pretty pastel colours looked with layered ribbons and vintage-style embellishments, I knew I had to give it a Christmas makeover. These baubles are perfect for:

  • Decorating a fireplace mantle 
  • Creating a festive display in your entryway 
  • Grouping under the tree for a whimsical look 
  • Using as an oversized table centrepiece for Christmas lunch 

The best part? This project is completely customisable. You can choose classic Christmas reds and greens, go all out in gold and silver, or (my personal favourite) lean into soft candy colours like pink, mint, and aqua for a retro sweet-shop feel.

Supplies You’ll Need

  • Plastic punch bowl – Any size works, but the larger the better for that dramatic bauble look. Dollar store bowls are perfect. 
  • Spray paint in pastel pink (or your chosen bauble colour) 
  • Optional: Pastel blue or mint paint for accent baubles 
  • Strong glue – E6000 or a hot glue gun with strong-hold glue sticks 
  • Decorative ribbons – pink, candy stripe, metallic gold, pastel green 
  • Wire-edged ribbon – essential for creating big bows that hold their shape 
  • Ornament “cap” – a short piece of wooden dowel, chunky wooden knob, or thrifted ornament topper 
  • Extra embellishments – faux greenery, mini baubles, candy picks, glitter sprays 
  • Scissors 
  • Painter’s tape (if you want to add painted patterns or stripes) 

Step-by-Step Instructions

1. Prep Your Punch Bowl

Start by giving your punch bowl a quick wash with warm, soapy water to remove any oils or fingerprints. Dry it completely — paint won’t stick well to a dusty or greasy surface.
If your punch bowl has a high shine, you can lightly sand it with fine-grit sandpaper for better paint adhesion (optional but helpful).

2. Paint the Bauble

Take your punch bowl outside or to a well-ventilated area.

  • Apply light, even coats of pastel pink spray paint, allowing each coat to dry before adding the next. 
  • For a more vintage look, add a light mist of pearl or gold spray over the top once dry. 
  • If you want patterns (stars, stripes, or snowflakes), use painter’s tape to mask areas before painting. Remove the tape while the paint is still slightly tacky to avoid peeling. 

Tip: Bowls with a cut-glass pattern or textured surface will catch the paint beautifully and create a frosted glass effect.

3. Create the Ornament Top

This step gives your bauble that classic Christmas ornament look.

  • Cut your wooden dowel to about 3–4 inches long or use a chunky wooden knob. 
  • Paint it cream, gold, or metallic silver. 
  • Glue it securely to the bottom (now the “top”) of the punch bowl. 
  • Let it dry fully before moving on. 

4. Make the Bow

Oversized bows are the real showstopper here.

  • Cut a generous length of wide, wire-edged ribbon for your base layer. 
  • Layer complementary ribbons on top — for example, candy-striped ribbon, pink sparkle ribbon, and pastel green metallic. 
  • Pinch the centre and secure with floral wire or a zip tie. 
  • Fluff and arrange until your bow looks full and balanced. 

5. Attach the Bow & Embellishments

Glue or wire the bow to your ornament cap.
Tuck in extra details like:

  • Glittered branches or faux greenery 
  • Small candy cane picks 
  • Mini baubles in matching colours 
  • Curled metallic ribbon strands for a playful touch 

6. Display Your Baubles

Arrange your baubles in a group of three for maximum impact — mix sizes and colours for variety.
Place them on your mantle, under the Christmas tree, or on a sideboard.
If you want them outdoors, spray with a clear weatherproof sealant.


  • Use a smaller plastic bowl to make “mini” versions for table centrepieces. 
  • Paint in metallic gold and pair with deep burgundy ribbon for a rich, traditional look. 
  • Use frosted glass spray for a snowy effect. 

This project is one of those “why didn’t I think of that?” crafts — it’s simple, affordable, and endlessly adaptable. Whether you go sweet and pastel or classic and elegant, you’ll end up with oversized Christmas baubles that look like you spent a fortune, but only cost a few dollars.


* This article was originally published here

Tuesday, November 25, 2025

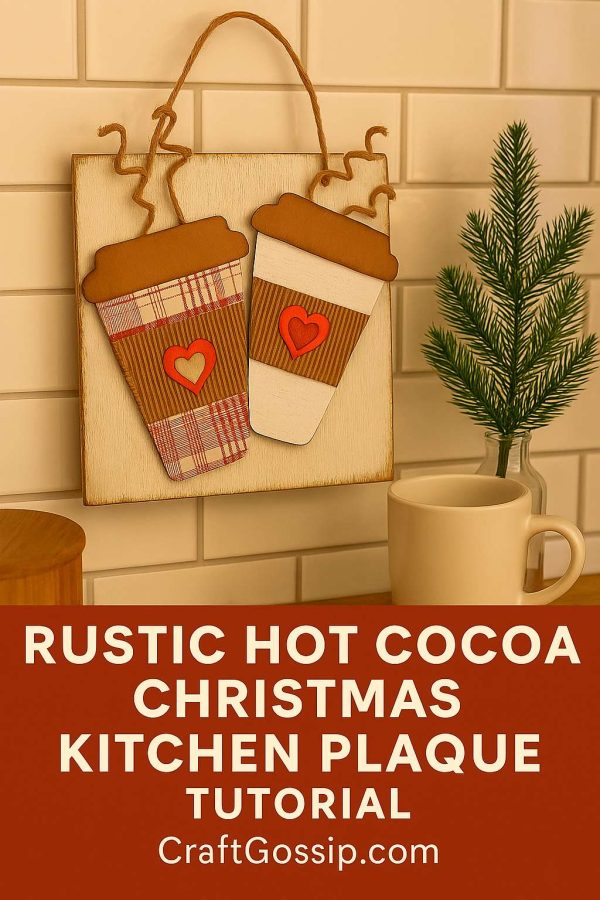
Rustic Hot Cocoa Christmas Kitchen Plaque Tutorial

Rustic Hot Cocoa Christmas Kitchen Plaque Tutorial

Nothing says “cozy Christmas kitchen” quite like the smell of hot cocoa—and now, you can capture that warmth in a rustic holiday plaque that’s as charming as it is easy to make. This project uses cardstock, patterned scrapbook paper, and a few farmhouse-style details to create steaming cups of cocoa you can hang in your kitchen or gift to a cocoa-loving friend.

Supplies

  • Brown cardstock (for the cup lids) 
  • Patterned scrapbook paper in plaid prints (for the cup bodies) 
  • Corrugated cardboard or textured brown paper (for the cup sleeves) 
  • Red and cream cardstock (for the heart embellishments) 
  • Small piece of rustic wood or wooden plaque 
  • Brown ink pad or brown acrylic paint for dry brushing 
  • Jute twine (for steam swirls and hanger) 
  • Craft glue or hot glue gun 
  • Scissors 
  • Pencil 
  • Wire (optional, if you want your steam to hold a stiffer curl) 

Instructions

Step 1 – Prepare Your Base
If you’re using raw wood, give it a rustic finish by lightly dry brushing white paint across the surface. Don’t cover it completely—you want the wood grain to peek through.

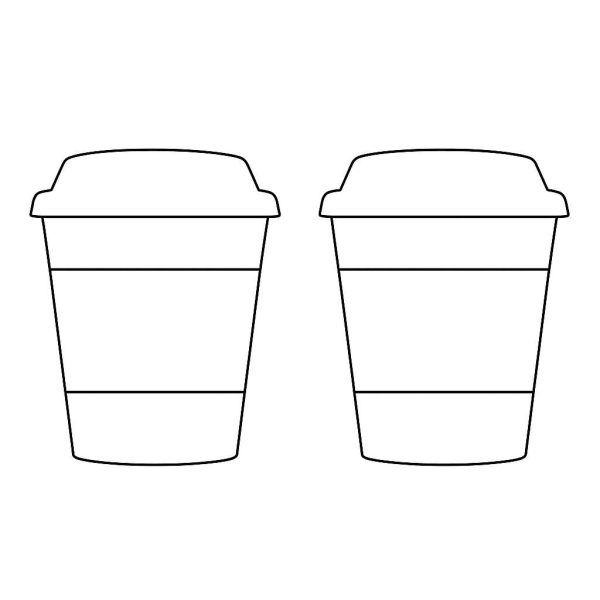
Step 2 – Cut the Cup Pieces
From brown cardstock, cut out two cup lids.
From plaid scrapbook paper, cut two tapered rectangles for the cup bodies.
From corrugated cardboard or textured brown paper, cut rectangles for the cup sleeves.

Step 3 – Make the Hearts
Cut small cream hearts from cardstock. Cut slightly larger red hearts, then glue the cream hearts in the center for a layered effect.

Step 4 – Add Rustic Aging
Using a dry brush technique, lightly stroke brown ink or diluted brown paint along the edges of all your paper pieces. This gives them a worn, farmhouse feel.

Step 5 – Assemble the Cups
Glue the plaid cup body to the plaque. Add the lid on top, then glue the corrugated sleeve to the center. Attach the layered heart to the middle of the sleeve.

Step 6 – Create the Steam
Cut three pieces of jute twine for each cup. If you want them curly, wrap the twine around a pencil, spray lightly with water, and let dry—or use thin wire inside the twine for a permanent curl. Glue the steam pieces just above the lid.

Step 7 – Add the Hanger
Cut a length of jute twine and glue or staple it to the back of your plaque to hang.

Step 8 – Final Touches
Lightly dry brush the whole piece with brown ink or paint for that “been in the kitchen forever” look.

Display Tip: Hang it above your coffee bar or next to your stove during the holiday season for instant cozy vibes.


* This article was originally published here


* This article was originally published here
Monday, November 24, 2025

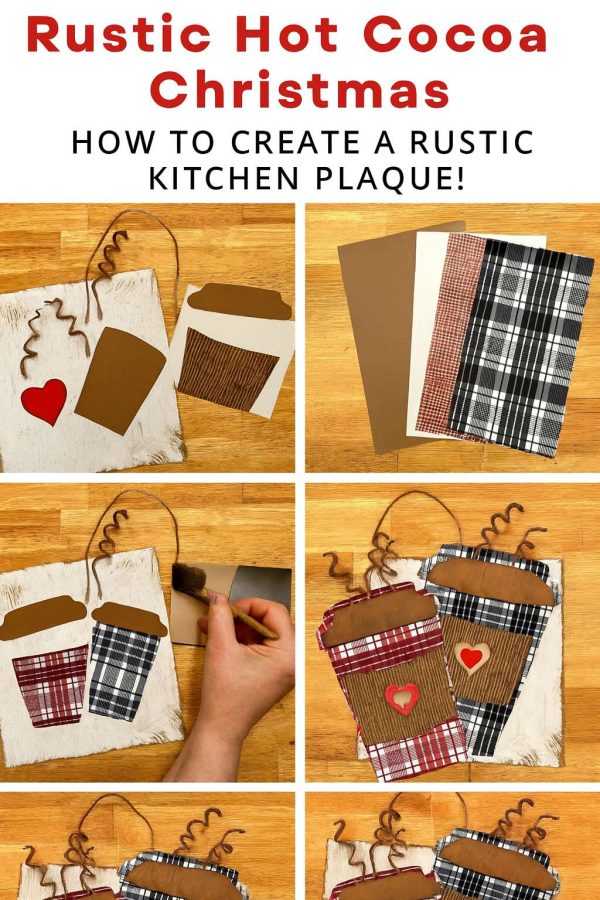
Rustic Hot Cocoa Christmas Kitchen Plaque Tutorial

Rustic Hot Cocoa Christmas Kitchen Plaque Tutorial

Nothing says “cozy Christmas kitchen” quite like the smell of hot cocoa—and now, you can capture that warmth in a rustic holiday plaque that’s as charming as it is easy to make. This project uses cardstock, patterned scrapbook paper, and a few farmhouse-style details to create steaming cups of cocoa you can hang in your kitchen or gift to a cocoa-loving friend.

Supplies

  • Brown cardstock (for the cup lids) 
  • Patterned scrapbook paper in plaid prints (for the cup bodies) 
  • Corrugated cardboard or textured brown paper (for the cup sleeves) 
  • Red and cream cardstock (for the heart embellishments) 
  • Small piece of rustic wood or wooden plaque 
  • Brown ink pad or brown acrylic paint for dry brushing 
  • Jute twine (for steam swirls and hanger) 
  • Craft glue or hot glue gun 
  • Scissors 
  • Pencil 
  • Wire (optional, if you want your steam to hold a stiffer curl) 

Instructions

Step 1 – Prepare Your Base
If you’re using raw wood, give it a rustic finish by lightly dry brushing white paint across the surface. Don’t cover it completely—you want the wood grain to peek through.

Step 2 – Cut the Cup Pieces
From brown cardstock, cut out two cup lids.
From plaid scrapbook paper, cut two tapered rectangles for the cup bodies.
From corrugated cardboard or textured brown paper, cut rectangles for the cup sleeves.

Step 3 – Make the Hearts
Cut small cream hearts from cardstock. Cut slightly larger red hearts, then glue the cream hearts in the center for a layered effect.

Step 4 – Add Rustic Aging
Using a dry brush technique, lightly stroke brown ink or diluted brown paint along the edges of all your paper pieces. This gives them a worn, farmhouse feel.

Step 5 – Assemble the Cups
Glue the plaid cup body to the plaque. Add the lid on top, then glue the corrugated sleeve to the center. Attach the layered heart to the middle of the sleeve.

Step 6 – Create the Steam
Cut three pieces of jute twine for each cup. If you want them curly, wrap the twine around a pencil, spray lightly with water, and let dry—or use thin wire inside the twine for a permanent curl. Glue the steam pieces just above the lid.

Step 7 – Add the Hanger
Cut a length of jute twine and glue or staple it to the back of your plaque to hang.

Step 8 – Final Touches
Lightly dry brush the whole piece with brown ink or paint for that “been in the kitchen forever” look.

Display Tip: Hang it above your coffee bar or next to your stove during the holiday season for instant cozy vibes.


* This article was originally published here
Sunday, November 23, 2025

Readers reply: Do good fences really make good neighbours?

The long-running series in which readers answer other readers’ questions. This week, the knotty issue of home boundaries, and what the saying was intended to mean

They say “good fences make good neighbours”, presumably meaning that the stronger the boundary between you and people you need to deal with, the more robust the relationship. Is this really true? Jamila, via email

Send new questions to nq@theguardian.com.

Continue reading...

* This article was originally published here
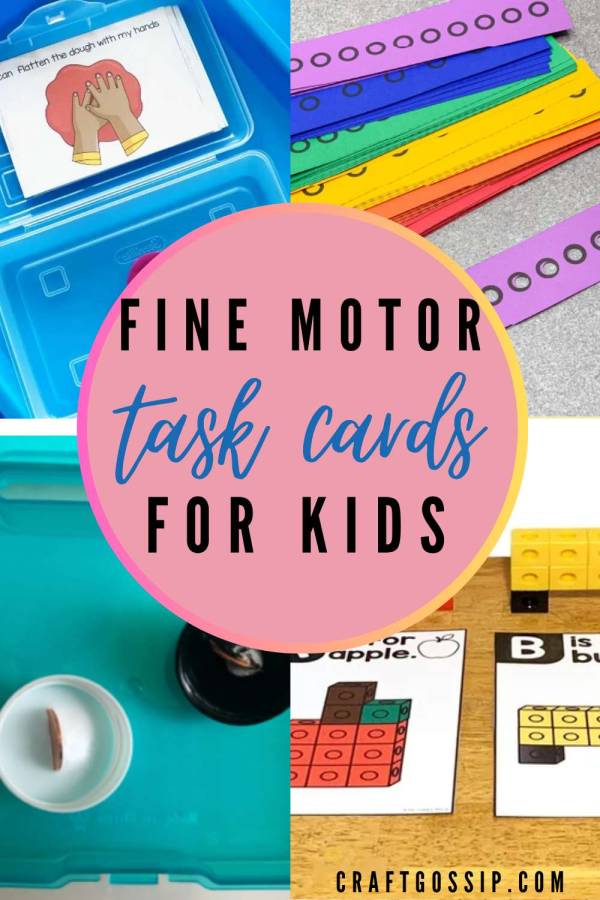
Fine Motor Task Cards for Kids

I don’t know why Pinterest just suddenly decided I needed to see all the content about task cards and task boxes for kids, but these ideas ...