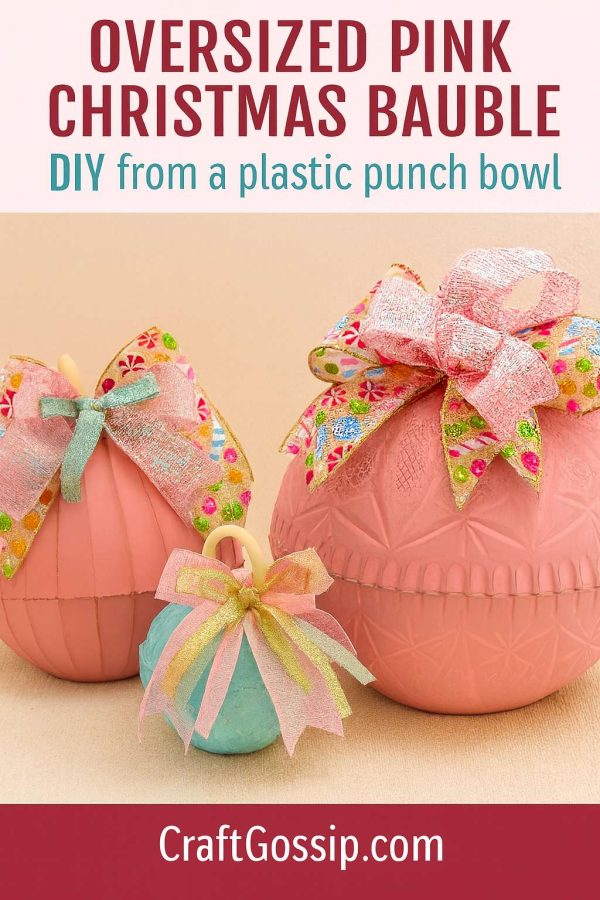

If you’ve been scrolling through Pinterest lately, you’ve probably seen those dreamy oversized ornaments popping up in pastel candy-shop colours. They’re festive, a little whimsical, and the perfect mix of vintage charm and modern holiday cheer. The only downside? Buying them can cost a small fortune.
But here’s the secret — you can make your own giant pink Christmas baubles for next to nothing, using a plastic punch bowl from the dollar store. Yes, really! With a few coats of spray paint, a handful of ribbon, and some creative flair, you can transform an everyday punch bowl into a stunning centrepiece that looks like it came straight from a high-end holiday boutique.
I first made a version of this project years ago for Halloween pumpkins, but when I saw how pretty pastel colours looked with layered ribbons and vintage-style embellishments, I knew I had to give it a Christmas makeover. These baubles are perfect for:
- Decorating a fireplace mantle
- Creating a festive display in your entryway
- Grouping under the tree for a whimsical look
- Using as an oversized table centrepiece for Christmas lunch
The best part? This project is completely customisable. You can choose classic Christmas reds and greens, go all out in gold and silver, or (my personal favourite) lean into soft candy colours like pink, mint, and aqua for a retro sweet-shop feel.
Supplies You’ll Need
- Plastic punch bowl – Any size works, but the larger the better for that dramatic bauble look. Dollar store bowls are perfect.
- Spray paint in pastel pink (or your chosen bauble colour)
- Optional: Pastel blue or mint paint for accent baubles
- Strong glue – E6000 or a hot glue gun with strong-hold glue sticks
- Decorative ribbons – pink, candy stripe, metallic gold, pastel green
- Wire-edged ribbon – essential for creating big bows that hold their shape
- Ornament “cap” – a short piece of wooden dowel, chunky wooden knob, or thrifted ornament topper
- Extra embellishments – faux greenery, mini baubles, candy picks, glitter sprays
- Scissors
- Painter’s tape (if you want to add painted patterns or stripes)
Step-by-Step Instructions
1. Prep Your Punch Bowl
Start by giving your punch bowl a quick wash with warm, soapy water to remove any oils or fingerprints. Dry it completely — paint won’t stick well to a dusty or greasy surface.
If your punch bowl has a high shine, you can lightly sand it with fine-grit sandpaper for better paint adhesion (optional but helpful).
2. Paint the Bauble
Take your punch bowl outside or to a well-ventilated area.
- Apply light, even coats of pastel pink spray paint, allowing each coat to dry before adding the next.
- For a more vintage look, add a light mist of pearl or gold spray over the top once dry.
- If you want patterns (stars, stripes, or snowflakes), use painter’s tape to mask areas before painting. Remove the tape while the paint is still slightly tacky to avoid peeling.
Tip: Bowls with a cut-glass pattern or textured surface will catch the paint beautifully and create a frosted glass effect.
3. Create the Ornament Top
This step gives your bauble that classic Christmas ornament look.
- Cut your wooden dowel to about 3–4 inches long or use a chunky wooden knob.
- Paint it cream, gold, or metallic silver.
- Glue it securely to the bottom (now the “top”) of the punch bowl.
- Let it dry fully before moving on.
4. Make the Bow
Oversized bows are the real showstopper here.
- Cut a generous length of wide, wire-edged ribbon for your base layer.
- Layer complementary ribbons on top — for example, candy-striped ribbon, pink sparkle ribbon, and pastel green metallic.
- Pinch the centre and secure with floral wire or a zip tie.
- Fluff and arrange until your bow looks full and balanced.
5. Attach the Bow & Embellishments
Glue or wire the bow to your ornament cap.
Tuck in extra details like:
- Glittered branches or faux greenery
- Small candy cane picks
- Mini baubles in matching colours
- Curled metallic ribbon strands for a playful touch
6. Display Your Baubles
Arrange your baubles in a group of three for maximum impact — mix sizes and colours for variety.
Place them on your mantle, under the Christmas tree, or on a sideboard.
If you want them outdoors, spray with a clear weatherproof sealant.
- Use a smaller plastic bowl to make “mini” versions for table centrepieces.
- Paint in metallic gold and pair with deep burgundy ribbon for a rich, traditional look.
- Use frosted glass spray for a snowy effect.
This project is one of those “why didn’t I think of that?” crafts — it’s simple, affordable, and endlessly adaptable. Whether you go sweet and pastel or classic and elegant, you’ll end up with oversized Christmas baubles that look like you spent a fortune, but only cost a few dollars.
* This article was originally published here

No comments:
Post a Comment