
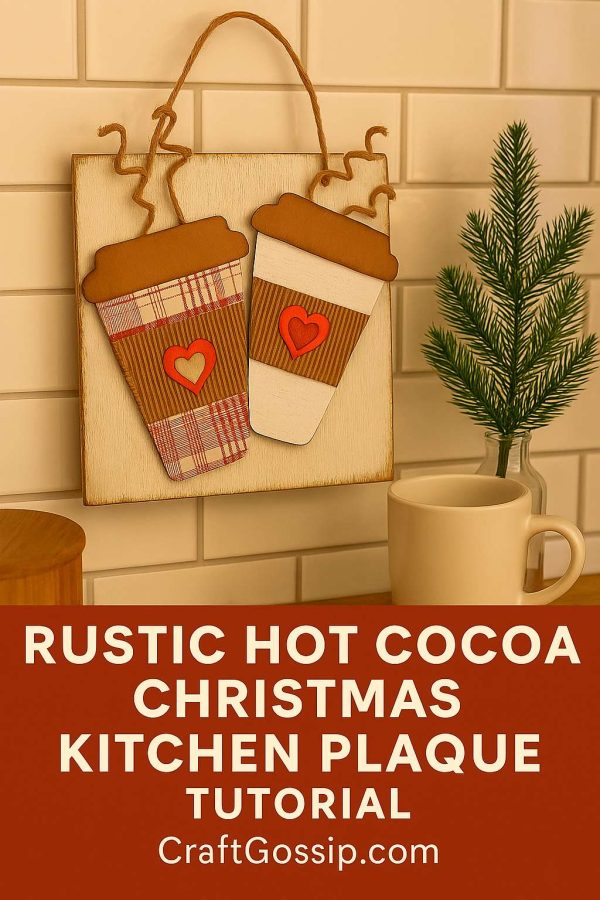
Nothing says “cozy Christmas kitchen” quite like the smell of hot cocoa—and now, you can capture that warmth in a rustic holiday plaque that’s as charming as it is easy to make. This project uses cardstock, patterned scrapbook paper, and a few farmhouse-style details to create steaming cups of cocoa you can hang in your kitchen or gift to a cocoa-loving friend.
Supplies
- Brown cardstock (for the cup lids)
- Patterned scrapbook paper in plaid prints (for the cup bodies)
- Corrugated cardboard or textured brown paper (for the cup sleeves)
- Red and cream cardstock (for the heart embellishments)
- Small piece of rustic wood or wooden plaque
- Brown ink pad or brown acrylic paint for dry brushing
- Jute twine (for steam swirls and hanger)
- Craft glue or hot glue gun
- Scissors
- Pencil
- Wire (optional, if you want your steam to hold a stiffer curl)
Instructions
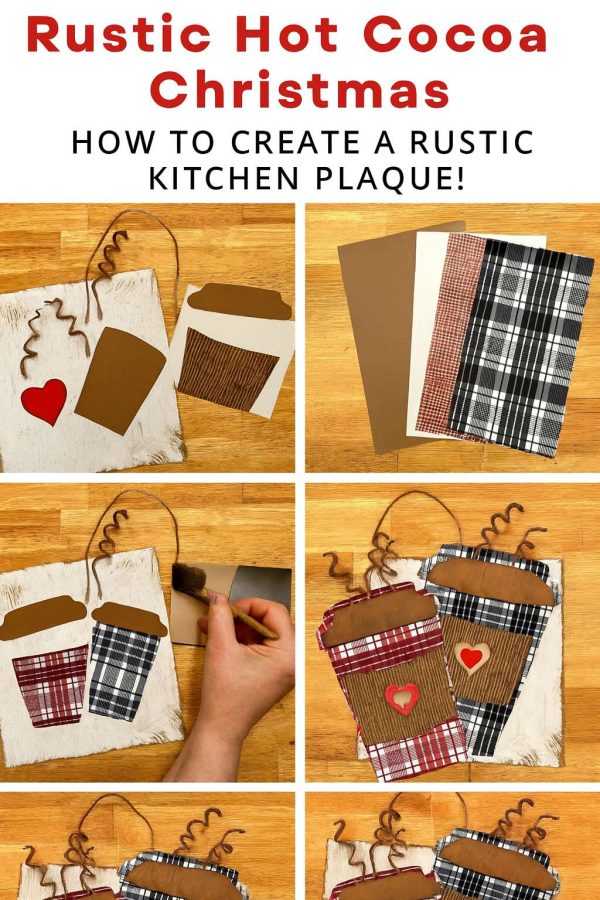
Step 1 – Prepare Your Base
If you’re using raw wood, give it a rustic finish by lightly dry brushing white paint across the surface. Don’t cover it completely—you want the wood grain to peek through.
Step 2 – Cut the Cup Pieces
From brown cardstock, cut out two cup lids.
From plaid scrapbook paper, cut two tapered rectangles for the cup bodies.
From corrugated cardboard or textured brown paper, cut rectangles for the cup sleeves.
Step 3 – Make the Hearts
Cut small cream hearts from cardstock. Cut slightly larger red hearts, then glue the cream hearts in the center for a layered effect.
Step 4 – Add Rustic Aging
Using a dry brush technique, lightly stroke brown ink or diluted brown paint along the edges of all your paper pieces. This gives them a worn, farmhouse feel.
Step 5 – Assemble the Cups
Glue the plaid cup body to the plaque. Add the lid on top, then glue the corrugated sleeve to the center. Attach the layered heart to the middle of the sleeve.
Step 6 – Create the Steam
Cut three pieces of jute twine for each cup. If you want them curly, wrap the twine around a pencil, spray lightly with water, and let dry—or use thin wire inside the twine for a permanent curl. Glue the steam pieces just above the lid.
Step 7 – Add the Hanger
Cut a length of jute twine and glue or staple it to the back of your plaque to hang.
Step 8 – Final Touches
Lightly dry brush the whole piece with brown ink or paint for that “been in the kitchen forever” look.
Display Tip: Hang it above your coffee bar or next to your stove during the holiday season for instant cozy vibes.

* This article was originally published here


No comments:
Post a Comment