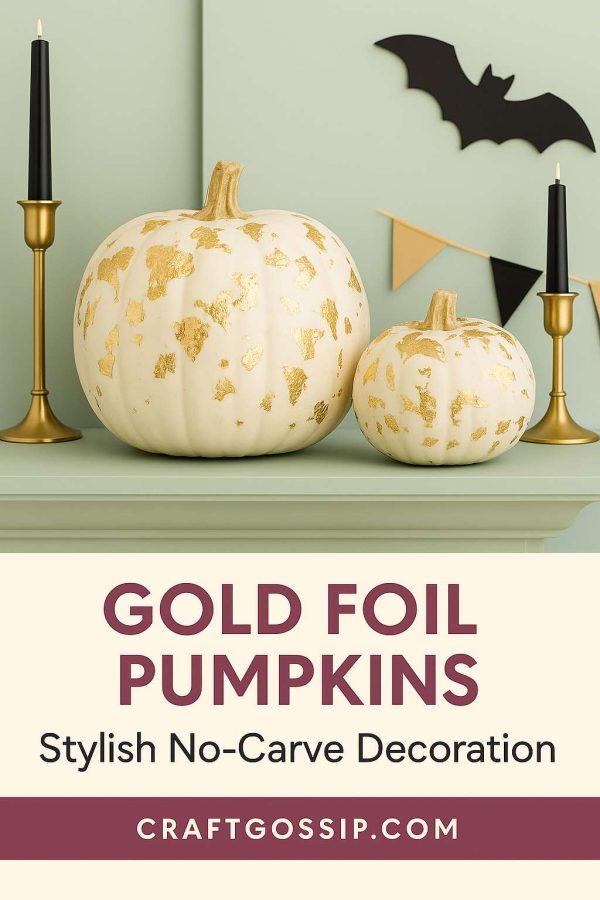
If glitter isn’t your thing but you still love a touch of sparkle, these Gold Foil No-Carve Pumpkins are your new autumn obsession. They’re elegant, easy, and add a high-end designer look to your seasonal décor without a single knife or mess in sight.
Whether you’re styling a coffee table, Thanksgiving centerpiece, or front porch display, these pumpkins bring the kind of cozy sophistication that makes guests say, “Wait—did you make those?”
(SEO keywords: gold foil pumpkins, no carve pumpkin ideas, fall home decor, glam Halloween crafts, DIY metallic pumpkins)
What You’ll Need
- White pumpkins (real or faux work beautifully)
- Gold foil sheets (look for craft or imitation leaf gold, available here on Amazon)
- Foil adhesive or Mod Podge
- Soft brush or foam applicator
- Small dry brush for removing excess foil
- Optional: Clear acrylic spray sealer for protection
Step-by-Step Instructions
Step 1: Prep Your Pumpkin
Wipe down your pumpkins with a damp cloth to remove any dirt, dust, or waxy residue. Make sure they’re completely dry before you start applying adhesive.
If you’re using faux pumpkins, a quick coat of matte white paint can help them look more natural and give the gold leaf something to grip onto.
Step 2: Apply the Adhesive
Brush a thin, even layer of foil adhesive or Mod Podge onto the areas you want the gold to stick. You can:
- Cover the top only for a dipped effect.
- Apply random patches for a chipped metallic look.
- Or go bold with full coverage for a solid gold statement pumpkin.
Let the adhesive become tacky — usually about 10–15 minutes (follow your product’s instructions).
Step 3: Lay the Gold Foil
Gently place your gold foil sheet onto the tacky surface. Don’t worry if it wrinkles or tears; those imperfections are what make it beautiful.
Press the foil down softly with a clean, dry brush or your fingers. You’ll see the metallic leaf start to adhere like magic.
Step 4: Remove Excess Foil
Once the foil is secure, use a soft dry brush to gently buff away any loose flakes. You’ll be left with a stunning distressed gold pattern that catches the light perfectly.
For more drama, layer a second sheet of foil on top and repeat the process.
Step 5: Seal (Optional)
If you’re displaying your pumpkins outdoors or plan to reuse them, lightly spray with a clear acrylic sealer. This keeps the foil from tarnishing and adds a soft satin finish.
Styling Tips
- For a cozy vignette: Pair with dark vases, dried grasses, and black or burgundy throws for that modern farmhouse-luxe look (just like pictured above).
- For a glam tablescape: Mix your pumpkins with brass candlesticks, white linens, and eucalyptus stems.
- For a minimalist Halloween: Keep everything monochrome — white pumpkins, black table, and a few metallic highlights.
CraftGossip Tip
Try mixing gold, silver, and copper foil on one pumpkin for a mixed-metal look that transitions beautifully from Halloween to Thanksgiving.
Or, if you love a little extra texture, use matte black paint as your base color instead of white — the gold foil will pop like you bought it from an interior boutique.
Why You’ll Love This Craft
- It’s mess-free — no carving, no pumpkin guts.
- Looks expensive but costs next to nothing.
- Great for holiday transitions — it works for Halloween and Thanksgiving décor.
- You can reuse faux versions every year.
20+ DIY Pumpkin Themed Centerpieces For Fall
A Beautiful No Carve Pumpkin Decorating Option
* This article was originally published here
No comments:
Post a Comment