
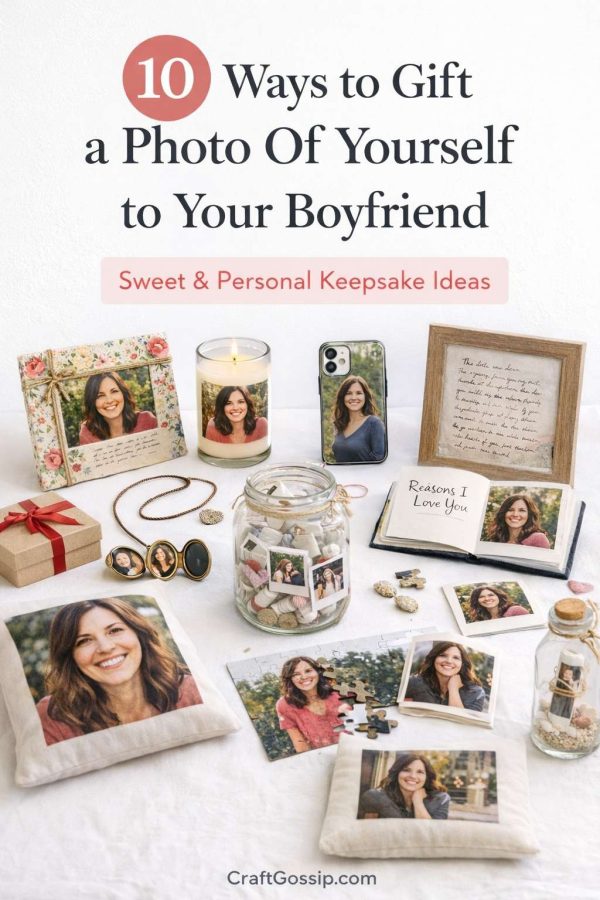
Gifting a photo of yourself is one of those ideas that sounds simple—but when it’s done thoughtfully, it becomes incredibly meaningful. The trick is turning that photo into something tangible, handmade, or useful so it feels intentional rather than awkward.
Below you’ll find step-by-step tutorials for each idea, using realistic supplies and no fancy equipment. These are keepsake-style gifts your boyfriend will actually keep, not quietly tuck away.
1. Handmade Photo Frame With Personal Details
You’ll need
- Plain wooden frame
- Printed photo
- Fabric, scrapbook paper, lace, or twine
- Craft glue or hot glue
- Pen or paint marker
How to make it
- Remove the glass and backing from the frame.
- Cover the frame front with fabric or paper, trimming neatly around edges.
- Add a simple embellishment—twine around the border or one small decorative element.
- Insert your photo and reassemble the frame.
- Write a short note or date on the back of the frame.
2. Photo Candle for a Cozy Gift
You’ll need
- Plain glass jar candle
- Printed photo (trimmed to size)
- Clear adhesive paper or Mod Podge
- Scissors
How to make it
- Trim your photo so it wraps neatly around the candle glass.
- Attach it to the outside using clear adhesive paper or a thin coat of Mod Podge.
- Let it dry fully before gifting.
- Add a small tag with the date or a short message.
3. Photo Locket or Necklace
You’ll need
- Locket or photo pendant
- Small printed photo
- Tweezers
- Craft glue (optional)
How to make it
- Print the photo slightly smaller than the locket opening.
- Trim carefully so it sits flat.
- Place the photo inside using tweezers.
- Secure with a tiny dot of glue if needed.
- Present it in a small box with a handwritten note.
4. Polaroid Photo Jar With Notes
You’ll need
- Glass jar with lid
- Mini photo prints or Polaroids
- Paper scraps
- Pen
- Ribbon or string
How to make it
- Print 10–20 small photos of yourself.
- Write a short note to match each photo.
- Fold or roll the notes with the photos.
- Place everything into the jar.
- Tie ribbon around the lid and label it.
5. Custom Photo Puzzle
You’ll need
- Printed photo
- Cardboard or thick cardstock
- Glue
- Scissors or craft knife
How to make it
- Glue the photo onto cardboard and let dry completely.
- Draw puzzle shapes on the back.
- Cut carefully into pieces.
- Place pieces in a small box or bag.
- Include a note for him to assemble it.
6. Phone Case With Your Photo
You’ll need
- Clear phone case
- Printed photo
How to make it
- Trim the photo to fit the inside of the case.
- Slide the photo between the phone and the case.
- Adjust until centered and smooth.
7. Mini Photo Book About You
You’ll need
- Small blank notebook or photo booklet
- Printed photos
- Glue or photo corners
- Pen
How to make it
- Choose a theme for the book.
- Add one photo per page.
- Write short captions or dates beneath each image.
- Keep the book short and intentional.
8. Photo Pillow or Cushion
You’ll need
- Plain pillow cover
- Fabric transfer paper or printable pillow cover
- Iron
How to make it
- Print your photo onto transfer paper.
- Iron it onto the pillow cover following instructions.
- Let cool completely.
- Insert pillow and fluff.
9. Message-in-a-Bottle Photo Gift
You’ll need
- Glass bottle or jar
- Small printed photo
- Paper
- Twine or string
How to make it
- Write a heartfelt letter.
- Roll the letter and photo together.
- Tie with string.
- Place inside the bottle.
- Add dried flowers or decorative filler if desired.
10. Framed Photo With Handwritten Overlay
You’ll need
- Photo frame
- Printed photo
- Tracing paper or vellum
- Pen
How to make it
- Place the photo inside the frame.
- Write your message on tracing paper.
- Layer the paper over the photo.
- Secure everything inside the frame.
A Quiet Crafting Tip
The most meaningful photo gifts aren’t perfectly styled—they’re honest. Choose photos that feel natural, handwriting that sounds like you, and details that reflect your relationship. That’s what turns a simple image into a keepsake.
* This article was originally published here


No comments:
Post a Comment