
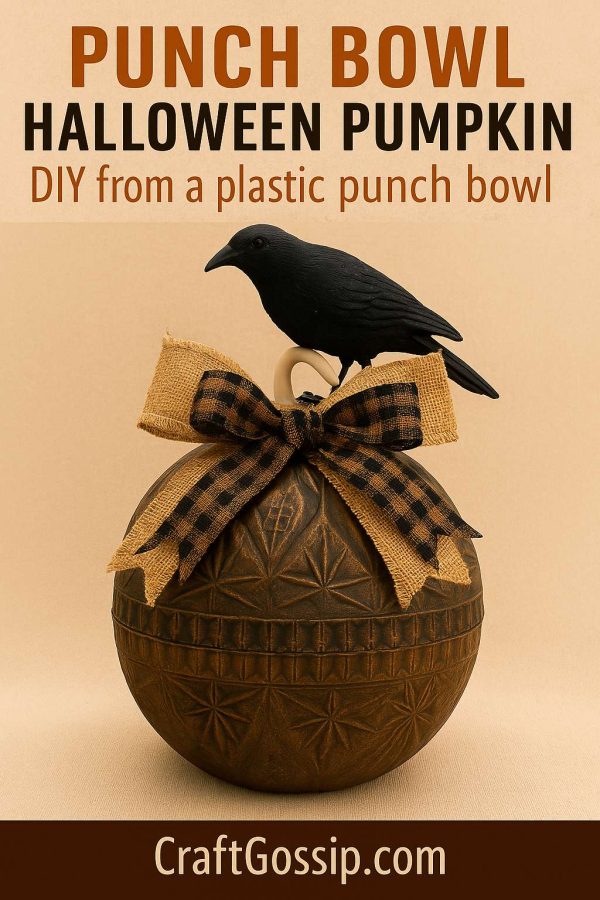
There’s something about primitive Halloween décor that just makes a space feel instantly cosy — even when it’s a little spooky. This pumpkin combines rustic charm with a dash of Halloween mischief, thanks to a distressed brown-and-black finish and a curious little crow perched right on top.
It’s made from two plastic punch bowls stacked together, so it’s big enough to make an impact whether you put it on your porch, in your hallway, or as part of a creepy autumn vignette. Best of all, you can customise the stem — sculpt one from clay for a smooth, shaped look, or keep it truly rustic by using a cut-off twig or branch.
Supplies
- Two plastic punch bowls (same size)
- Strong glue – E6000 or hot glue with strong hold
- Spray paint – flat black and matte brown (or burnt umber)
- Optional – copper or gold paint for light dry brushing
- Clay for stem – air-dry or oven-bake OR a cut-off twig/branch (3–4 inches)
- Rustic ribbon – black and orange plaid, burlap, or a mix
- Faux crow – small size, lightweight
- Sandpaper (fine grit)
- Paintbrush (for dry brushing)
- Drop cloth/newspaper for painting area
Instructions
1. Prepare the Pumpkin Base
- Wash and dry the punch bowls.
- Lightly sand them so the paint sticks better.
- Place one bowl upside-down and glue the other bowl on top, rim-to-rim. This forms your pumpkin shape and creates a visible seam for that primitive handmade look.
2. Paint the Pumpkin
- Spray the entire pumpkin with flat black paint as your base coat. Let it dry completely.
- Once dry, spray a light coat of matte brown over the top, letting some black show through around creases and edges for depth.
- For extra ageing, lightly dry brush with copper or gold paint over the raised patterns.
3. Make the Stem
Clay option:
- Shape a short, chunky stem from clay, about 3–4 inches tall.
- Add subtle ridges for a realistic look.
- Let air dry (or bake if using oven-bake clay) according to the clay’s instructions.
- Paint the stem in a muted tan or brown with a little black at the base for shadowing.
Twig option:
- Find a sturdy twig or small branch around 3–4 inches long.
- Sand any rough ends and leave the natural bark for texture.
Glue your stem securely to the top of the pumpkin.
4. Add the Bow
- Cut a length of black-and-orange plaid ribbon and a slightly longer length of burlap.
- Layer them together, tie into a bow, and fluff.
- Attach the bow at the base of the stem with hot glue.
5. Perch the Crow
- Position your faux crow so it sits slightly angled, as though it’s watching over the pumpkin patch.
- Glue it firmly to the stem or directly onto the pumpkin top.
6. Finishing Touches
- If you want it for outdoor use, spray the entire piece with a clear matte sealant to protect it from moisture.
- Display on your porch, mantle, or next to a basket of autumn leaves and gourds for a complete primitive Halloween scene.
Tips:
- To give the pumpkin a truly “aged” look, scuff some areas with sandpaper after painting.
- If you prefer a jack-o’-lantern face, stencil or freehand it on before sealing.
- Swap the crow for a bat, owl, or bundle of dried corn husks for a different twist.
* This article was originally published here


No comments:
Post a Comment